
There's so much hype around Generative AI these days, fresh off the heels of the metaverse cool down, largely due in part to the release of ChatGPT-4 by OpenAI (Microsoft partner) in March 2023. Unless you've been living under a rock, I'm sure you've heard about all its greatness and faults.
It's certainly opened my eyes to the world of Generative AI, and I thought it might bring value to humans of the internet if I shared my impressions and learning experiences as I navigate the world of Generative AI through Stable Diffusion. So here we go, but first...
What is Generative AI?
Good question. Let's ask ChatGPT.
a type of artificial intelligence capable of creating new and original content, such as images, videos, and text using complex algorithms...
That's quite good, actually— in layman's terms, it's a program that learns on its own (that's the deep learning part) and applies what it's learned to perform a task, like answering my question above. I see it as the pinnacle of biomimetics, as we're training computers to learn the way humans do, or rather the way babies do, except, much quicker and with unlimited access to knowledge available on the internet. It's a both terrifying and exciting at the same time, and will most definitely shape the way we live for the next 20 years.
What is Stable Diffusion?
Stable Diffusion is a deep learning text-to-image generator originally created as a research project by Stability AI, RunwayML, and CompVis. Text-to-image means you can prompt the AI with words and it will spit out an image. It's not the only text-to-image generator, there's also- Midjourney (created by the co-founder of Leap Motion) and DALL-E (OpenAI), however of the options, Stable Diffusion is the only open source option and that's why I decided to go with it, as I'm an advocate for open source.
The next sections will cover generating an AI image in a light tutorial format. Should take under an hour, in case you want to code along. Alright, let's get into the setup.
Setting up Stable Diffusion
Ideally, you want to set up Stable Diffusion with a good GPU, any modern gaming computer should work fine. However, it also runs on Mac Silicon(!), so I'll be setting it up on my Mac Mini M1.
There's an amazing github repo AUTOMATIC1111/stable-diffusion-webui which makes the setup a breeze. In the Wiki section of the repo, it goes over the installation instructions for Mac Silicon.
After you clone the repo, one thing to note is that the repo does not come with any Models out of the box, you'll have to add them yourself. But what's a Model?
Models aka Checkpoints
Models or checkpoint (.ckpt) files are pre-trained Stable Diffusion weights intended for generating general images or a genre of images. So in essence, a model determines the style of the outcome. But don't worry- it's not like you are stuck with the one you choose, you can have many models on your machine and go back and forth between them. Just note that these models tend to be large, ~2-6gb per model, so you may be limited based on your harddrive capacity.
Now, that we know what a model is— where can we get them? Enter Hugging Face.
Hugging Face
Hugging Face is an open source AI community for sharing machine learning models and datasets. Also, they happen to have the cutest logo 🤗. We'll be using Hugging Face as our primary source for models.
For now, let's start with the OG model- CompVis/stable-diffusion-v-1-4-original which contains the 4gb .ckpt file we'll want to get started with.
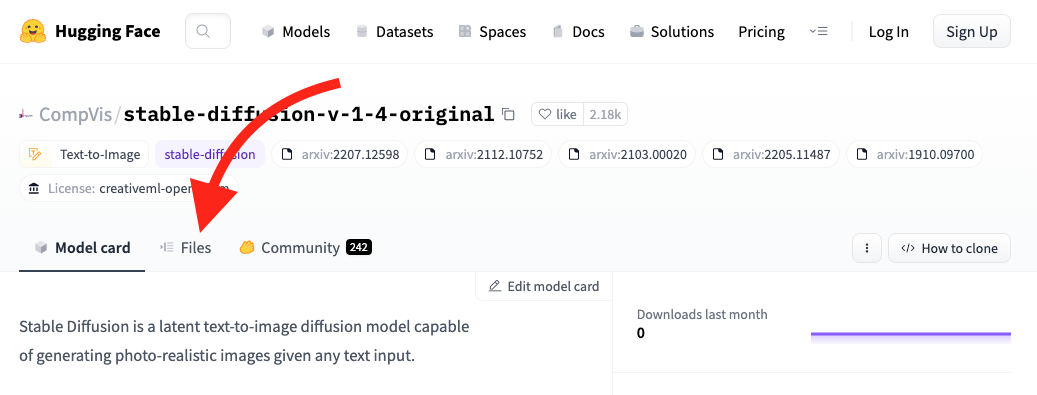
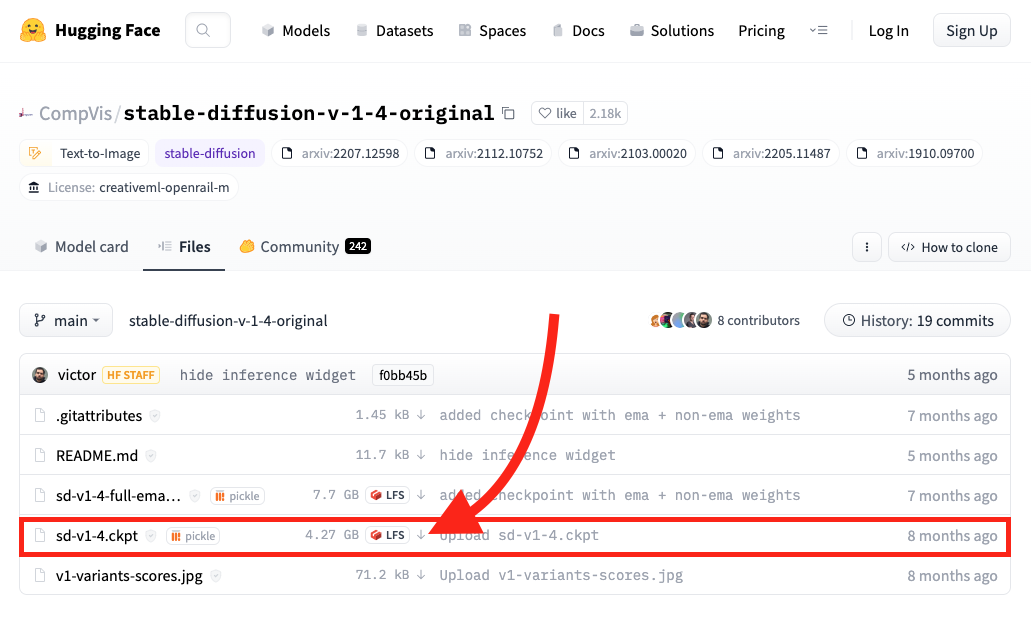
After you land on the repo page, go to the Files tab. Then look for sd-v1-4.ckpt and click on the down arrow next to LFS to download the file.
Once download is complete, you'll want to move the .ckpt file into the models directory /stable-diffusion-webui/models/Stable-diffusion. You can do this from terminal like so:
cd stable-diffusion-webui
mv ~/Downloads/sd-v1-4.ckpt ./models/Stable-diffusion
Note: the /models/Stable-diffusion folder will be the home for all the models you download. Ok, we have our model placed in the proper folder, let's fire up the Web UI.
Running it locally
Ok, so we now have stable-diffusion-webui and we have a model in the models folder. Next, simply open up terminal and type the following:
cd stable-diffusion-webui
./webui.sh
Now, open up your web browser and hop on over to https://127.0.0.1:7860. You should see something that looks like this:
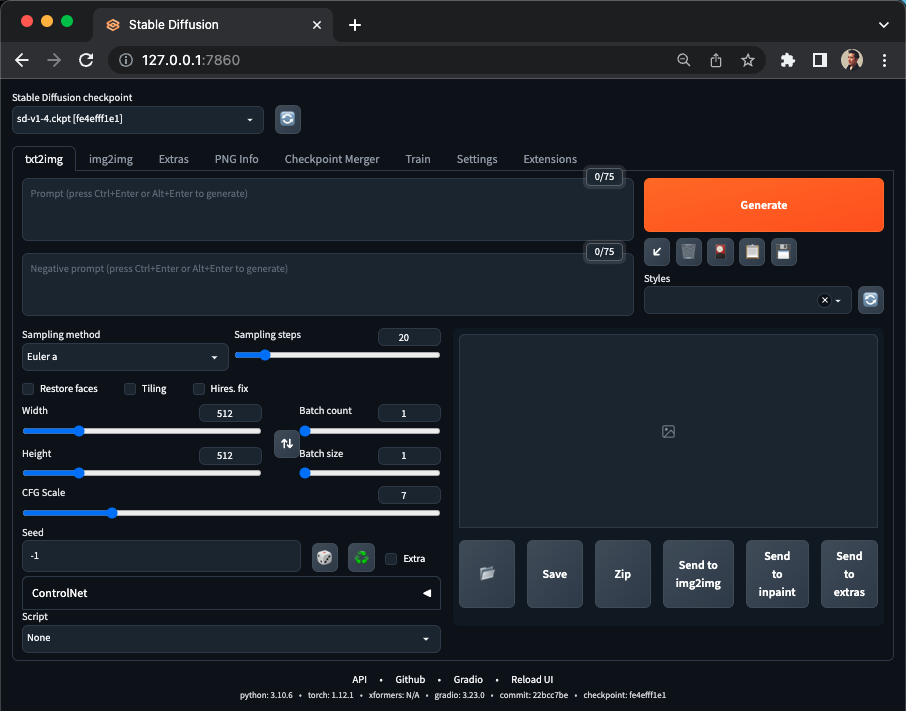
There's a lot going on in this GUI and it can be kinda overwhelming. As I prefaced at the start of the post, I'm learning too. So I won't go through each UI element (and perhaps in a future post I will), but I'll go over key UI elements you'll want to use to generate an image.
A brief tour of the WebUI
The top portion of the GUI:
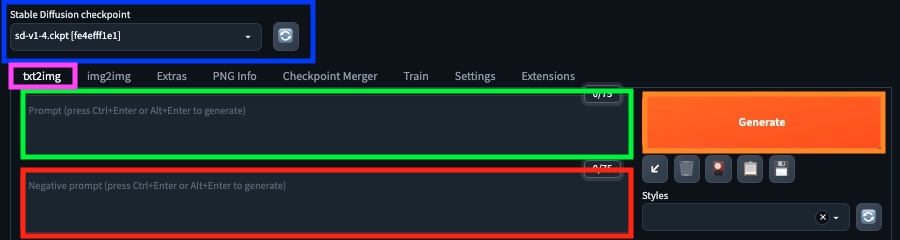
Stable Diffusion Checkpoint (blue) - Model selection. As mentioned in earlier, we can change models here depending on the style you want to generate. Currently, we should have sd-v1-4.ckpt selected.
txt2img (purple) - The mode. Let's keep this at txt2img because that's what we want.
Prompt (green) - The prompt. Text to guide the AI for image generation. More on this later.
Negative Prompt (red) - Negative prompt. Words we don't want used for image generation.
Generate (orange) - Generate button. It kicks off the image generation process.
The bottom portion of the GUI:
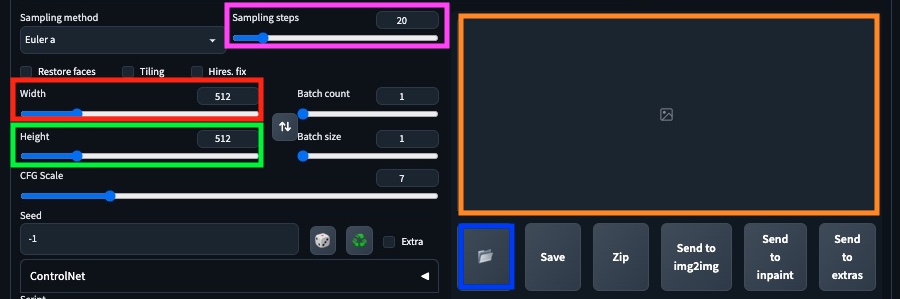
Sampling steps (purple) - The number of generation rounds. Generally, higher the better quality, but the longer it takes. Usually 20-25 is the sweet spot.
Width (red) - Output image width in pixels. Default 512.
height (green) - Output image height in pixels. Default 512.
Preview (orange) - The preview window. Image shows here once generation is complete.
Folder (blue) - Opens the local folder containing generated images. It autosaves all generated images.
Ok, now that we have a basic understanding of the UI. Let's get move forward with creating a prompt.
All in the prompt
The quality of text you enter into the prompt will determine how close you get to what you intended. Funny enough, this is a new discipline called Prompt Engineering and I can imagine it will only become more popular as generative AI tools and LLMs become mainstream.
I found some example prompts from PromptHero to give me a starting point. Here is the prompt I decided to go with:
8k ultra realistic, futuristic city, lens flare, atmosphere,
glow, detailed, intricate, full of color, cinematic lighting,
trending on artstation, 4k, hyperrealistic, focused,
extreme details, unreal engine 5, cinematic, masterpiece
And for the negative prompt:
fog, darkness, grain, duplicate, face, human
Lastly, I increased the height to 648. Everything else I kept as-is. Then, click the fat orange Generate button. Depending on your machine, this process could take seconds to 1-2 minutes. Once the generation is complete, click on the Folder button, and you'll see the saved images in your folder!
Get ready. It's about to get spicy!
Results
Here are my favorite generated images using the above prompt via Stable Diffusion 1.4.
Each image took my Mac Mini M1 about a minute to generate. Except the last one which took about 4 minutes because I up'd the Sampling Steps to 80 to see how much better the quality could get. I think there is definitely an improvement.
As you can tell, these images are not perfect, but that's not the point. It's just amazing to see these images generated in minutes by giving the computer some text. There's a lot more that I want to explore, such as animations and in-painting. It's an ever changing landscape as there's developments happening daily, so I hope to learn more!
Side notes
Hugging Face and Civitai (which also seems reputable) have tons of models available for download. Remember every model will yield a different style, so go out and try different models, until you find the one that meets your heart's desire!
Note: .ckpt files could contain viruses or malicious code, so a safer alternative is .safetensors file format. If it is available on a given repo, opt for this file, since it contains purely model data. You'd then drop the file in the models directory, similar to the previous workflow outlined above.
Takeaways
We learned from a high level that Generative AI is a type of AI that creates content based on a given dataset. Stable Diffusion is a text-to-image generator built on the Generative AI paradigm. And we've also covered a light tutorial on setting up Stable Diffusion on Mac Silicon and generating our first images.
If you made it this far, truly thank you. This is my first post, and if you have any comments or feedback, would love to hear them! Feel free to message me on twitter or email. Hope you learned something. Have an awesome day y'all!